
Open floor plans look amazing when empty. Once you start living in them, things change. Noise travels, work bleeds into personal space, and there’s nowhere to step away.
That’s usually when people start searching for a sliding panel room divider.
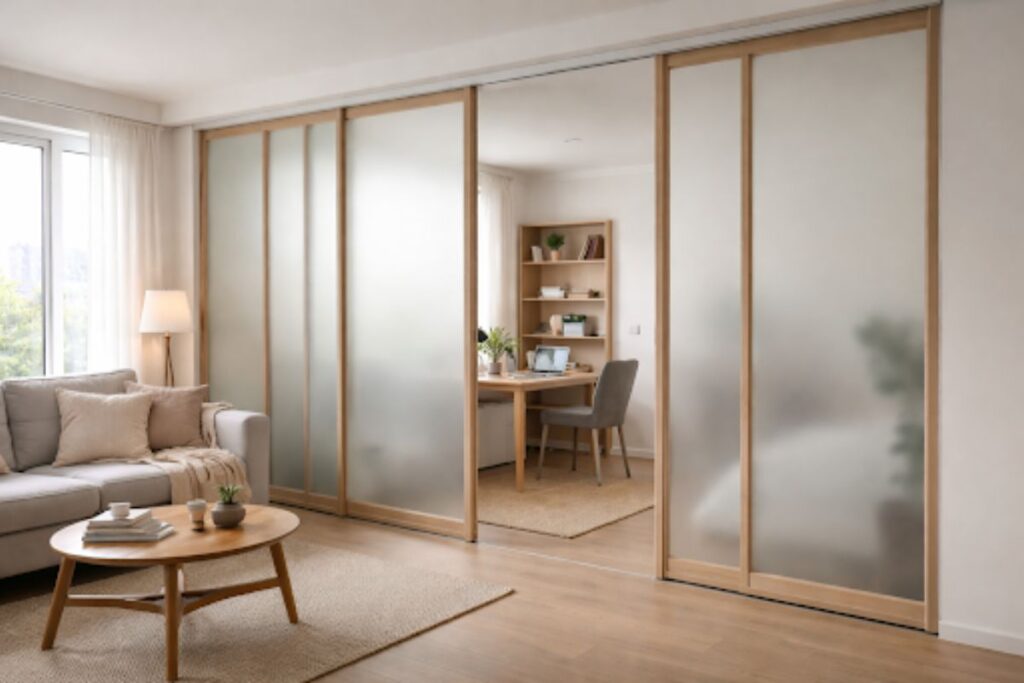
A sliding panel room divider is a ceiling-mounted panel track system that allows you to divide a room without permanent construction.
It’s not just about looks. You’re trying to fix a layout problem without building a wall, dealing with permits, or spending thousands on construction. You want something flexible that actually works day to day.
This guide walks you through how to choose the right sliding room partition, what it really costs in the US, and the small decisions that make a big difference once it’s installed.
What Is a Sliding Panel Room Divider?
At its core, this is a panel track room divider, often called a sliding room partition system, that lets you divide a room without building a wall.
You install a track, usually on the ceiling. Panels hang from it and glide sideways. Close them when you need separation. Slide them back when you want an open layout again.
Simple idea, but the impact is huge when it’s done right.
It’s one of the few temporary wall solutions that doesn’t feel temporary.
Best Places to Use a Sliding Panel Room Divider (Studios, Offices, Open Layouts)
Studio apartments
This is where a room divider for studio apartment setups makes the biggest difference:
A typical setup: bed on one side, living area on the other. No privacy. No separation.
Add sliding panel room divider panels with a frosted finish, and suddenly the space feels intentional. You still get light, but you’re not staring at your bed all day.
Home offices
If you’ve ever taken a work call in a shared space, you know the problem.
A sliding room partition gives you a boundary. Close it during work hours, open it when you’re done. No need to dedicate a full room.
Open living areas
Large spaces often look better than they function.
You can use a space divider to create:
- A defined dining area
- A quiet reading corner
- A temporary guest setup
It gives structure without making the space feel smaller.
Shared rooms
Even a partial divider can make a shared bedroom feel more livable. It’s not perfect privacy, but it’s a noticeable upgrade.
Types of Sliding Panel Room Divider Systems (Panel Track, Materials & More)
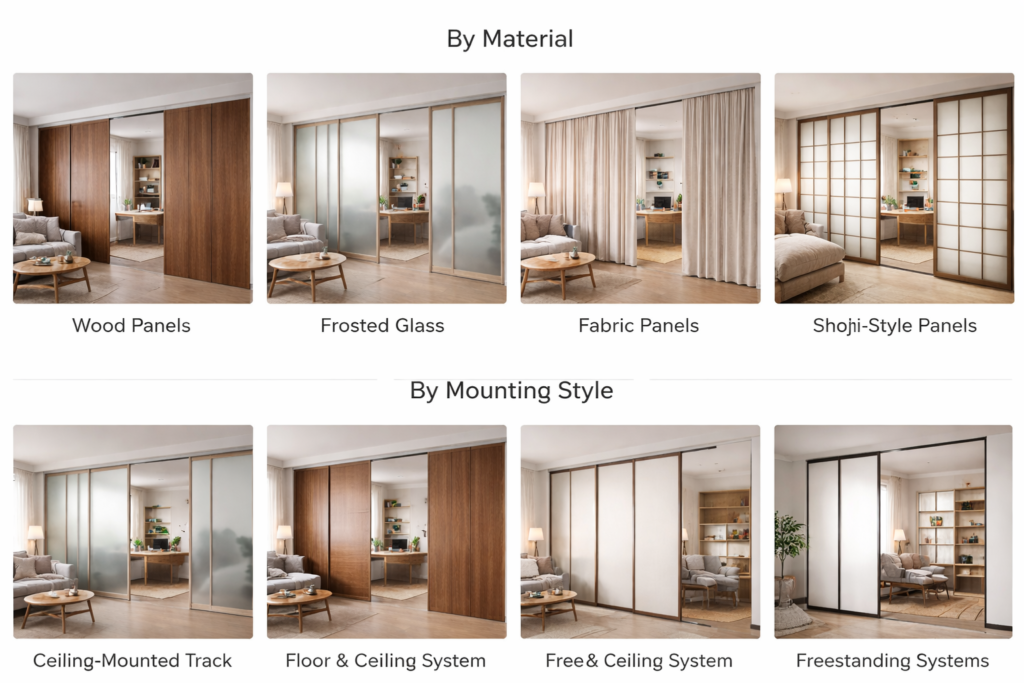
By material
Wood panels
If privacy matters, this is the strongest option. Solid, durable, and blocks visibility well. Just know they’re heavier and need proper support.
Frosted glass or acrylic
A popular choice in modern US homes. You get separation without losing natural light. Great for keeping spaces bright.
Fabric panels
These are more of a lightweight solution. Budget-friendly, easier to install, but closer to curtains in performance.
Shoji-style panels
Lightweight and softer visually. Works well in calm, minimal interiors.
By mounting style
Ceiling-mounted track
This is what most people go with. Clean look, no floor obstruction.
Floor and ceiling system
More stable, especially for heavier panels.
Freestanding systems
Best for renters who can’t drill. Not as solid, but practical.
Sliding Panel Room Divider Cost in the US
Here’s what people actually spend, not just what product pages suggest.
- Basic systems: $150 to $500
- Mid-range setups: $500 to $1,500
- Custom installations: $1,500 to $4,000+
Costs that catch people off guard:
- Installation: $200 to $800
- Better rollers or soft-close hardware: $50 to $300
- Anchoring or reinforcement: $50 to $150
Real-world insight
If you’re mounting into drywall without hitting a joist, you need proper anchors. Not optional. This is where a lot of DIY installs fail within months. According to Houzz, sliding panel room dividers rank among the most searched flexible interior solutions for open-plan homes across the United States.
How to Choose the Right Sliding Panel Room Divider
Step 1: Be honest about what you need
Do you actually need privacy, or just separation?
A lot of people overbuild. If you just want visual division, lighter panels will do the job.
Step 2: Measure properly
This sounds obvious, but it’s where mistakes happen.
Check:
- Ceiling height, usually around 8 feet in US homes
- Total width
- Space for panels to stack when open
Panels don’t disappear. They need somewhere to go.
Step 3: Match material to real use
- For work or shared rooms, go solid
- For light flow, go frosted
- For temporary setups, keep it simple
Step 4: Think about installation
If you’re renting, look for minimal-drill options.
If you own the place, a ceiling-mounted track is worth it. It looks better and performs better over time. The This Old House experts recommend ceiling-mounted track systems as the most durable and visually clean option for permanent residential installations.
Step 5: Plan for daily use
Ask yourself: Will you open and close this every day?
If yes, invest in smoother rollers or soft-close systems. You’ll notice the difference quickly.
Sliding Panel Room Divider Installation Guide (DIY & Pro)
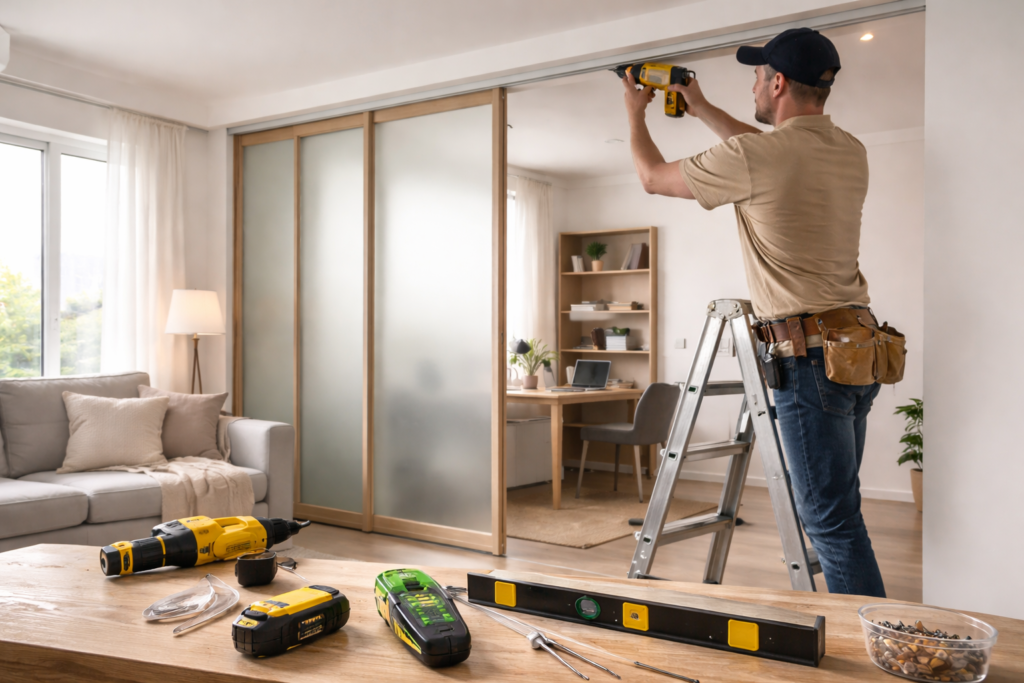
DIY setup
If you’re comfortable with basic tools, you can handle most systems.
You’ll need:
- Drill
- Stud finder
- Level
- Measuring tape
Basic steps:
- Mark the track placement
- Locate joists or install anchors
- Secure the track
- Hang panels
- Test the movement before finishing
Small but important tip
Before tightening everything fully, slide the panels back and forth a few times. If something feels off, fix it early. It’s much harder later.
When to bring in a professional
- Heavy panels like wood or glass
- Wide spans over 10–12 feet
- Uneven ceilings
A bad install usually shows up as sticking, noise, or sagging. None of those gets better over time.
Sliding Panel Room Divider vs Temporary Wall Divider Solutions
Sliding panels aren’t the only option. Some people look for temporary wall divider solutions, but those usually lack flexibility. If you need something more solid, sliding wall panels for rooms offer better structure than curtains or folding screens.
Curtains
Cheap and quick. Good for temporary setups.
Folding screens
No installation, easy to move. Limited coverage.
Bookshelf dividers
Adds storage but doesn’t fully separate space.
Temporary walls
More solid, but less flexible and more expensive.
Practical takeaway
If you want flexibility with a clean look, sliding panels hit the best balance.
Common Mistakes to Avoid
- Mounting into drywall without proper support
- Choosing panels too heavy for the track
- Forgetting about stacking space
- Expecting soundproofing
- Picking based on design instead of function
Most of these come down to planning. Get that right, and everything else becomes easier.
Pro Tips That Make a Noticeable Difference
- Go for wider panels if you want a cleaner look with fewer seams
- Soft-close tracks are worth it if you use the divider daily
- Mixed materials can solve multiple problems at once
- Check ceiling alignment before installing anything
- Plan lighting after dividing the space, not before
One more thing people don’t think about. Once you divide a room, one side often gets less light. A simple floor lamp can fix that.
Frequently Asked Questions
Are sliding panel room dividers soundproof?
No, they reduce noise but don’t fully block sound.
Can renters install them?
Yes, freestanding or minimal-drill systems work best.
What is the difference between a sliding room partition system and a panel track room divider?
A panel track room divider is a type of sliding room partition system designed for easy residential use with wide sliding panels.
Are sliding wall panels good for studio apartments?
Yes, they save space and create instant separation without permanent walls.
Can sliding room dividers be used as temporary wall solutions?
Yes, most are removable and work well for flexible, non-permanent setups.
What Actually Matters
A sliding panel room divider is one of those upgrades that seems simple but changes how your space works every day.
It gives you control. Open when you want space. Close when you need privacy.
If you approach it with a clear goal, accurate measurements, and realistic expectations, it’s hard to go wrong.
Most people don’t regret installing one. They usually just wish they had planned it a bit better the first time.
I started Domelite Home because I got tired of home improvement advice that was either too vague or written by people who had never actually picked up a drill. I’m Naik Zali Shah I’ve spent years obsessing over renovation projects, smart home setups, and interior design, and I built this site to share what actually works. No fluff, no filler. Just honest advice for homeowners who want to get things right the first time.

3 thoughts on “Sliding Panel Room Divider: The Smart Way to Divide Space Without Renovation”