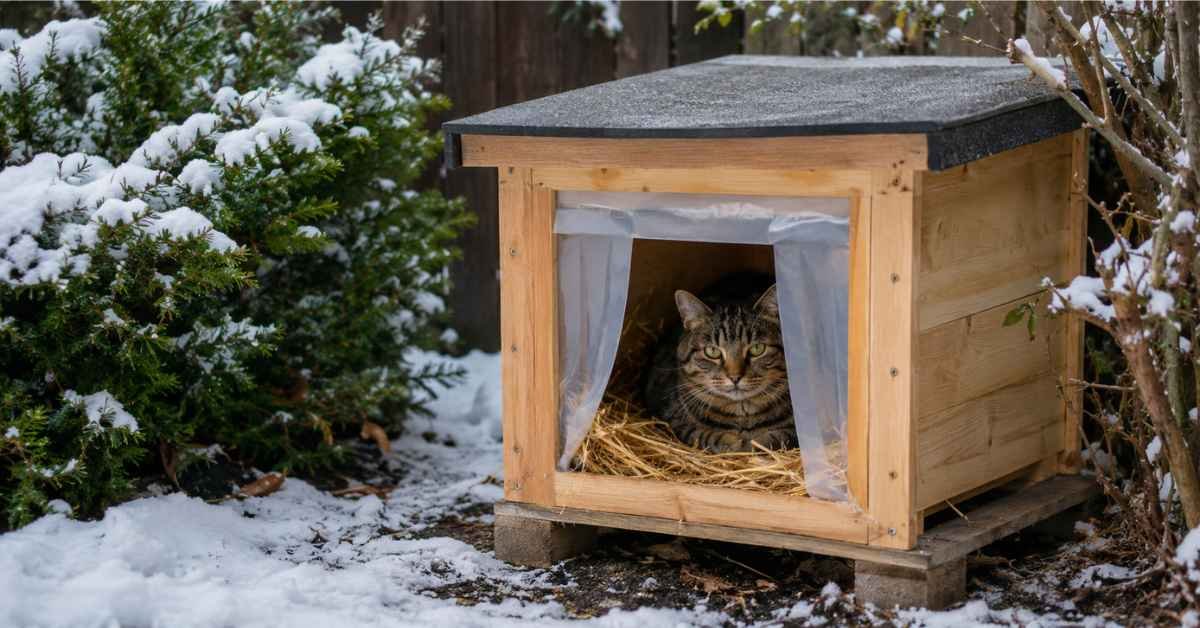
Quick Answer: What Is the Best Outdoor Cat House for Winter?
The best outdoor cat house for winter is a small, insulated, waterproof shelter with a raised floor, a cat-sized entrance, and dry straw bedding. For an affordable DIY option, use two sturdy plastic storage bins with insulation between them, or place a suitable foam cooler inside a protective outer container. Keep the entrance facing away from prevailing winds, seal gaps against rain, and raise the shelter above wet ground. Use straw instead of hay, blankets, or towels because it allows cats to nest while helping reduce moisture problems. During freezing weather, check the shelter daily and provide fresh, unfrozen water. No outdoor shelter can guarantee safety in extreme cold, so bring cats into a warm, protected space whenever possible.
An outdoor cat may have a thick coat, quick reflexes, and a favorite hiding spot, but winter weather can still put its health at risk. Cold wind, rain, damp ground, and freezing temperatures make it difficult for cats to stay warm, especially when they have nowhere dry to rest. A well-designed outdoor cat house for winter gives them a sheltered place to escape harsh weather without requiring an expensive construction project.
The good news is that you do not need advanced woodworking skills or a large budget to create a useful shelter. A plastic storage bin, a suitable insulation layer, and dry straw can form the basis of an effective DIY cat house. If you would rather purchase one, understanding insulation, entrance size, and weather protection will help you choose a better product.
This guide explains how to build a winter cat shelter, which materials work best, what to look for when buying a ready-made model, and how to keep the shelter safe throughout the colder months.
What Makes a Good Outdoor Cat House for Winter?
A good winter cat house does more than provide a roof. It protects against wind and precipitation while helping the cat retain its own body heat. The ASPCA’s community-cat shelter guidance highlights the importance of insulated shelters, cat-sized entrances, and dry bedding.
Think of the shelter as a small insulated room rather than a miniature garden shed. A large, open space can allow body heat to escape, while a compact sleeping area helps a cat warm its surroundings more efficiently. The shelter should still be large enough for the cat to enter comfortably, turn around, and curl up naturally.
Insulation, Waterproofing, and the Right Size
Insulation is one of the most important features of an outdoor cat house. It slows the loss of heat, helping the shelter remain more comfortable when temperatures drop. Double-wall plastic containers with insulation between them, thick foam coolers, and properly constructed wooden shelters can all be suitable options.
Waterproofing matters just as much. Even a heavily insulated shelter becomes uncomfortable when rain or melting snow soaks the bedding. Choose a secure lid or sloped roof, seal gaps where water could enter, and raise the structure above wet ground. Position the entrance away from prevailing winds and direct rain whenever possible.
The entrance should be relatively small, generally around 5.5 to 6 inches wide for an average adult cat, with adjustments for the animal’s size. An opening several inches above the floor can help reduce rain splash and prevent shallow water from running inside. However, check the entrance after heavy snowfall so it does not become blocked.
A second exit may be helpful in locations where predators could corner a cat, but it can also allow more cold air inside. Consider the local risks before deciding whether a second entrance is necessary.
How to Build a DIY Outdoor Cat House for Winter
Building your own shelter is a practical option if you want to control the materials, size, and placement. For most beginners, a double-bin design is easier to assemble than a wooden structure and does not require complicated carpentry. The basic idea is simple: use one container as the outer shell, another smaller container as the inner shelter, and insulation to reduce heat loss.
Best Friends Animal Society recommends simple insulated shelters using materials such as foam coolers and durable plastic coverings. Its guidance also emphasizes keeping shelters dry and securing them against wind.
Materials and Tools You Need
Gather the materials before you start so you can build the shelter in one session. You will need two sturdy plastic storage bins with lids, one small enough to fit inside the larger container while leaving room for insulation. Alternatively, you can use a suitable rigid foam cooler inside a protective outer bin.
You will also need dry straw for bedding, a marker, a measuring tape, a utility knife, durable waterproof tape, and a stable base such as a wooden board or suitable pavers. A ruler and a piece of cardboard can help you mark a neat entrance.
Choose materials that will not leave sharp edges or expose the cat to loose insulation fibers. Wear protective gloves and eye protection when cutting plastic, and work on a stable surface. Keep the cat away from the work area and remove all loose scraps before putting the shelter into use.
Step-by-Step DIY Instructions
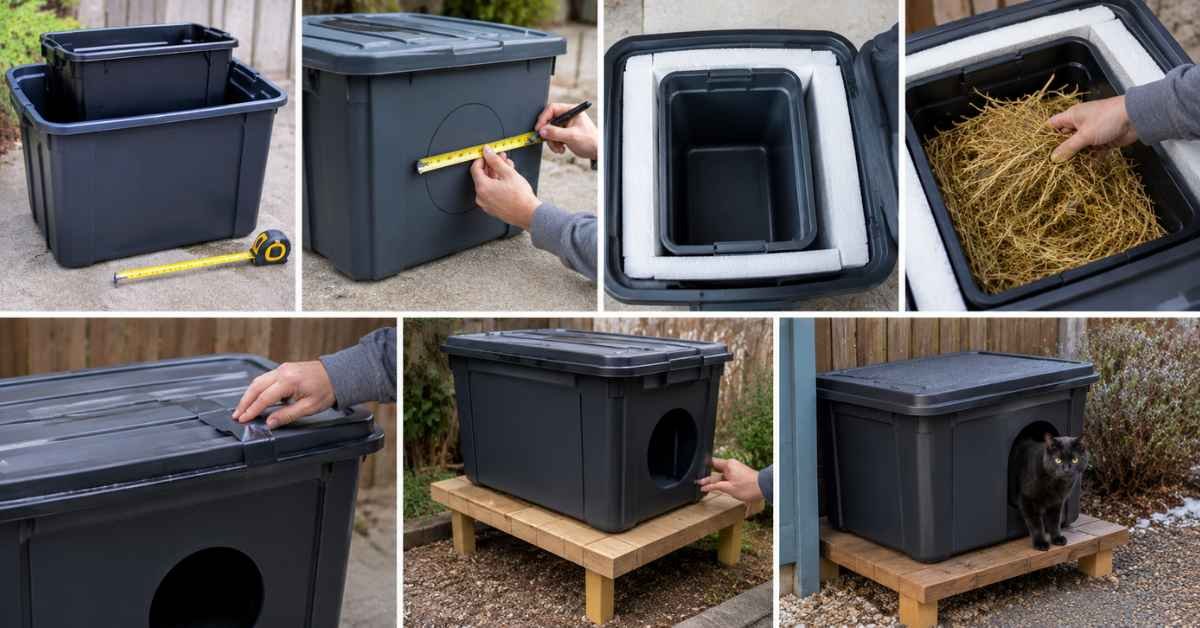
Step 1: Choose and measure the containers. Place the smaller bin inside the larger one and check that there is enough room around the sides, base, and top for the insulation layer. The interior should not be unnecessarily spacious because a smaller sleeping area is easier to keep warm. Make sure the lids can close securely once the shelter is assembled.
Step 2: Mark and cut the entrance. Mark a circular opening approximately 5.5 to 6 inches wide on one side of each container, adjusting it for the cat that will use the shelter. Position the opening a few inches above the bottom to help keep rain and shallow runoff out. Align the two openings carefully so the cat can move through both layers without difficulty. Use the appropriate cutting tool for the material and smooth or cover all rough edges.
Step 3: Fit the insulation. Place the smaller container inside the larger one. Fill the gap with suitable rigid insulation or another safe, moisture-resistant insulating material that cannot be reached or chewed by the cat. If using a design that relies on straw between the walls, pack it loosely and ensure the outer shell protects it from moisture. Avoid leaving exposed fiberglass or loose foam pieces inside the sleeping area.
Step 4: Add dry bedding. Place several inches of clean, dry straw inside the smaller container. Straw allows the cat to burrow into the bedding and is less likely than many fabrics to hold moisture against the animal. Do not pack the shelter so tightly that the cat has no room to settle comfortably.
Step 5: Secure the lid and protect the exterior. Close the outer lid firmly and use appropriate waterproof tape to secure any vulnerable seams. Make sure the entrance remains clear and that the roof does not collect water. If the shelter will sit in an exposed location, add a weather-resistant cover or protective roof without blocking ventilation or the entrance.
Step 6: Raise and secure the shelter. Place the finished structure on a stable, level platform above the ground. Use a safe, flat weight or secure fastening to prevent strong winds from moving it. Check that the shelter cannot tip forward or trap a cat inside.
Step 7: Test the finished shelter. Check the inside for dampness, sharp edges, exposed insulation, and gaps that could let in rain. Make sure the lid opens for cleaning and that the cat can enter and leave easily. Once the shelter is ready, place it in a quiet, protected location and give the cat time to investigate it.
For more DIY inspiration, read the Best Friends Animal Society’s guide to helping outdoor cats in winter.
Best Materials for a Warm Outdoor Cat Shelter
The materials you choose determine how well your shelter handles wind, rain, and temperature changes. You do not necessarily need the most expensive option. Instead, prioritize insulation, durability, moisture resistance, and safe construction.
Plastic storage bins are convenient because they are widely available, lightweight, and easy to clean. However, a single thin bin offers limited insulation, so adding a second container and an appropriate insulating layer makes it more useful during cold weather.
Rigid foam coolers are another practical choice because the thick walls provide insulation without requiring much assembly. Their main weakness is durability: exposed foam can break or be damaged by animals and weather. A protective outer container helps extend the shelter’s life.
Wood can work well when properly constructed, but it needs weather-resistant finishing, a sound roof, and protection against moisture entering through joints. Metal containers are generally less suitable because metal conducts heat readily and can become very cold.
Why Straw Is Better Than Hay or Blankets
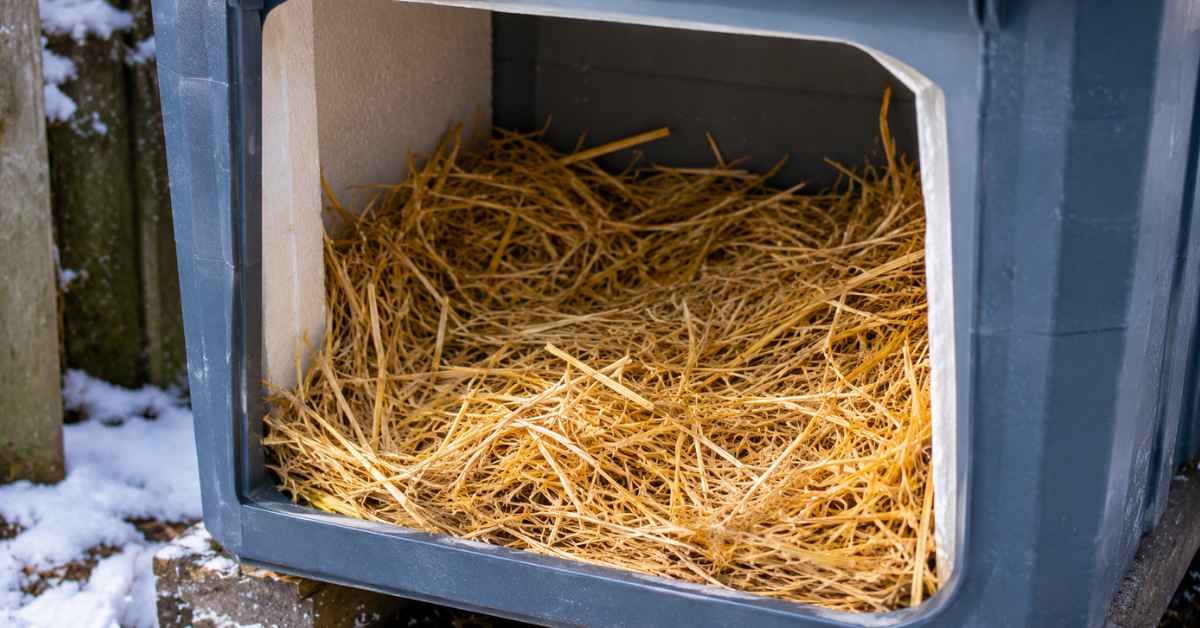
Straw is one of the best bedding choices for an outdoor winter shelter because it allows cats to burrow while helping keep moisture away from their bodies. It is different from hay, even though the two materials can look similar. Hay is intended primarily as animal feed and tends to absorb moisture, which can leave the shelter damp and uncomfortable.
Alley Cat Allies specifically recommends straw rather than hay for outdoor cat shelters. It advises using enough straw for cats to nest in while keeping the bedding loose and dry.
Blankets, towels, and cotton bedding may seem softer, but they can absorb rain or condensation and remain wet. In freezing weather, damp fabric can draw heat away from a cat instead of helping it stay warm. If you use a washable pet bed in a completely sheltered, dry location, check it frequently; for an exposed winter shelter, dry straw is generally the more practical choice.
Replace straw whenever it becomes wet, dirty, compacted, or moldy. Store spare bedding in a dry place so you can refresh the shelter after storms.
DIY vs. Buying a Ready-Made Outdoor Cat House
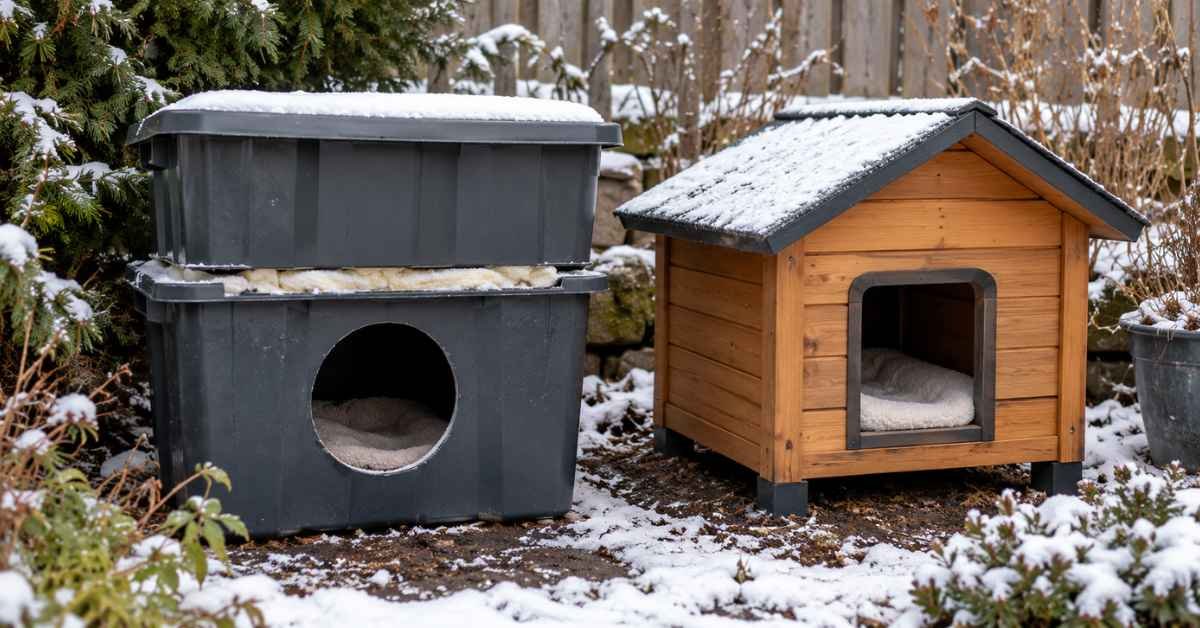
Both approaches can work well, but the right choice depends on your budget, available tools, local weather, and the cat’s needs. A DIY shelter is useful when you have suitable containers and want an inexpensive solution. A ready-made model may save time and look more finished, but its design matters more than its marketing claims.
| Feature | DIY winter cat shelter | Ready-made winter cat house |
| Initial cost | Often low if materials are available | Varies by size, insulation, and construction |
| Assembly | Requires measuring and basic tools | Usually simpler; some models need assembly |
| Insulation | You choose the materials and thickness | Depends on the manufacturer’s design |
| Weather protection | Depends on how carefully you build it | Depends on roof, seams, and exterior materials |
| Maintenance | Easy if the lid is removable | Look for accessible, removable panels or roofs |
| Customization | Easy to adapt to the location | Limited to the available sizes and designs |
A DIY shelter can be a sensible starting point for a stray or community cat, particularly when you need protection quickly. However, do not assume that every homemade shelter is automatically warmer than a commercial product. A poorly sealed plastic bin can allow rain inside, while a well-designed commercial shelter may offer better insulation and durability.
Features to Check Before Buying
Before purchasing an outdoor cat house for winter, examine the product specifications rather than relying on photographs alone. Some houses are designed mainly for outdoor lounging in mild weather, while others are specifically insulated for cold conditions.
Look for thick or double-wall construction, a weather-resistant roof, protected seams, a raised floor, and an entrance that suits the cat. A removable roof or lid makes it easier to replace bedding and inspect the interior. The shelter should also be sturdy enough to withstand wind without tipping over.
Check whether the manufacturer provides clear cleaning instructions and explains which temperatures the shelter is intended to handle. If the product includes electrical heating, verify that the heating component is specifically rated for outdoor pet use and that its cable, plug, and connections are protected according to the manufacturer’s instructions.
Be cautious about relying on a heated shelter alone. A warm interior cannot compensate for water entering through the roof or an unsafe electrical setup. For many outdoor cats, a properly insulated, dry, unheated shelter is a practical option.
If you are comparing different designs, explore Alley Cat Allies’ outdoor cat shelter options gallery for examples of shelter styles and construction approaches.
Where to Place an Outdoor Cat House
Even a well-insulated shelter can perform poorly if you place it in an exposed area. Wind can blow rain through the entrance, water can collect underneath the floor, and direct exposure to storms can damage the outer structure. Choose a quiet, sheltered location that offers protection without preventing the cat from entering and leaving freely.
A covered porch, protected corner beside a building, or sheltered area behind a sturdy fence can be a good choice. Position the entrance away from the prevailing wind and direct rainfall. Leave enough clearance around the doorway so the cat can approach without feeling trapped.
Raise the shelter several inches above the ground using a stable platform, suitable lumber, or solid pavers. The exact height depends on the location, but the goal is to prevent ground moisture from entering and to reduce heat loss through direct contact with cold surfaces. Avoid unstable stacks of bricks or anything that could collapse when a cat jumps onto the shelter.
Drainage is particularly important if your yard collects rainwater. Inspect the location after a storm to see whether water pools around the base. If the shelter sits near a fence or wall, check that it remains accessible and that other animals cannot easily corner the cat.
You can also improve the surrounding area with practical weatherproofing ideas. For example, Domelite Home’s guide to home exterior hacks may help you think about sheltered outdoor spaces and protection from the elements.
Common Winter Cat Shelter Mistakes to Avoid

Small construction mistakes can make a noticeable difference to the comfort and safety of an outdoor cat. Fortunately, most are easy to prevent when you plan the shelter carefully.
Making the shelter too large: A spacious house might look comfortable, but a large interior can be harder for a cat to warm with its own body heat. Choose a compact sleeping space that allows the cat to curl up, turn around, and move naturally.
Leaving insulation exposed: Foam and loose insulation materials can become damaged or accessible to curious cats. Cover the insulation securely and check for broken pieces or sharp edges during routine inspections.
Using blankets in an exposed shelter: Towels, cotton sheets, and thick blankets can become damp and lose their insulating value. Use dry straw for the main sleeping area and replace it whenever it becomes wet or dirty.
Ignoring the roof and floor: A waterproof-looking container can still leak around its lid or entrance. Check seams, protect the floor from ground moisture, and make sure the roof sheds rain rather than collecting it.
Creating an entrance that is too large: A wide doorway can let in more wind and rain. Use a cat-sized opening, but adjust it if the intended cat is unusually large or has mobility limitations. Never make the entrance so small that the animal struggles to pass through it.
Forgetting about severe weather: Snow, fallen branches, flooding, and strong winds can block or damage a shelter. Inspect the site after severe weather and clear the entrance before the cat becomes trapped inside.
Adding unsafe heating: Household heating pads, exposed electrical cords, and improvised heaters can cause burns, electrical hazards, or fires. Use only products designed for outdoor pet shelters, follow all installation instructions, and keep electrical components protected from moisture.
How to Maintain a Cat House During Winter
A winter cat house needs regular attention even when it looks sturdy from the outside. Set a routine to inspect the shelter, refresh its bedding, and check that the cat can still use it comfortably.
After rain or snow, look for damp spots on the floor, condensation, leaks around the lid, and water entering through the doorway. Replace wet straw promptly and make sure the interior is completely dry before adding fresh bedding. Check the insulation for damage and confirm that the shelter remains stable on its base.
Keep the entrance clear of leaves, snow, and other debris. If you use a flap to reduce drafts, make sure the cat can push through it easily. Some unfamiliar cats may avoid a shelter with a flap at first, so introduce it gradually and watch how the animal responds.
Food and water also matter during cold weather. Outdoor cats may need additional calories to help meet their energy needs, while water can freeze during cold spells. Provide appropriate food and fresh water in a separate, protected feeding area rather than placing bowls inside the sleeping shelter, where spills can soak the bedding.
If you care for several outdoor cats, consider providing more than one shelter. This can reduce competition and give cats options if one shelter becomes occupied or unsuitable. Keep an eye on the animals themselves, too. A cat that appears weak, unusually lethargic, injured, or distressed may need prompt veterinary attention.
For longer-term outdoor improvements, explore Domelite Home’s guide to home renovation tips and money-saving tricks for ideas on making practical use of existing materials and improving sheltered spaces around your property.
Conclusion
A reliable outdoor cat house for winter does not need to be expensive or complicated. A well-built double-bin shelter, dry straw bedding, a small entrance, and protection from wind and rain can provide a useful resting place for an outdoor cat. If you prefer to buy a ready-made model, prioritize proper insulation, weather resistance, a raised floor, and easy cleaning over decorative features.
The most important part is not simply building or buying the shelter. It is keeping it dry, stable, clean, and accessible throughout winter. Check it regularly, refresh the bedding when necessary, and provide fresh food and water nearby. With thoughtful planning and routine care, you can make cold-weather conditions safer and more comfortable for the cats that depend on you.
Frequently Asked Questions
1. What is the cheapest way to make an outdoor cat house for winter?
A double plastic storage-bin shelter or a suitable foam cooler is often an inexpensive option, especially if you already have the materials. Add safe insulation, dry straw, a secure lid, and a raised base. The final cost depends on the materials available locally.
2. What should I put inside an outdoor cat house in winter?
Use clean, dry straw that allows a cat to burrow and nest. Avoid hay, which tends to retain moisture, and avoid blankets or towels in exposed shelters because they can become wet and cold. Check and replace bedding regularly.
3. Should an outdoor cat house have two entrances?
Not always. A single small entrance can help retain warmth and limit drafts. A second exit may be useful where predators could trap a cat, but it can also allow more cold air inside. Choose the design according to the shelter’s location and safety risks.
4. Is an insulated outdoor cat house warm enough without electricity?
A small, well-insulated, dry shelter can help a cat retain body heat without electrical heating. However, no unheated shelter can guarantee safety during extreme cold. Monitor weather conditions, check the cat regularly, and provide access to a warmer protected space when necessary.
5. How do I encourage a stray cat to use a new winter shelter?
Place the shelter in a quiet location where the cat already feels comfortable. Add fresh straw and allow the cat to investigate without forcing it inside. You can offer food nearby, then gradually move it to a separate feeding area once the shelter is familiar. Give the cat time to adjust and keep the entrance unobstructed.

I’m Samreen Khadim Hussain, a home improvement writer specializing in practical, research-driven content for U.S. homeowners. At Domelite Home, I cover home renovation, interior design, home maintenance, and residential safety, translating technical information and industry research into clear, actionable guidance. My approach combines search intent research, reliable sources, and reader-focused writing to help homeowners understand their options, make informed decisions, and create safer, more functional living spaces.