
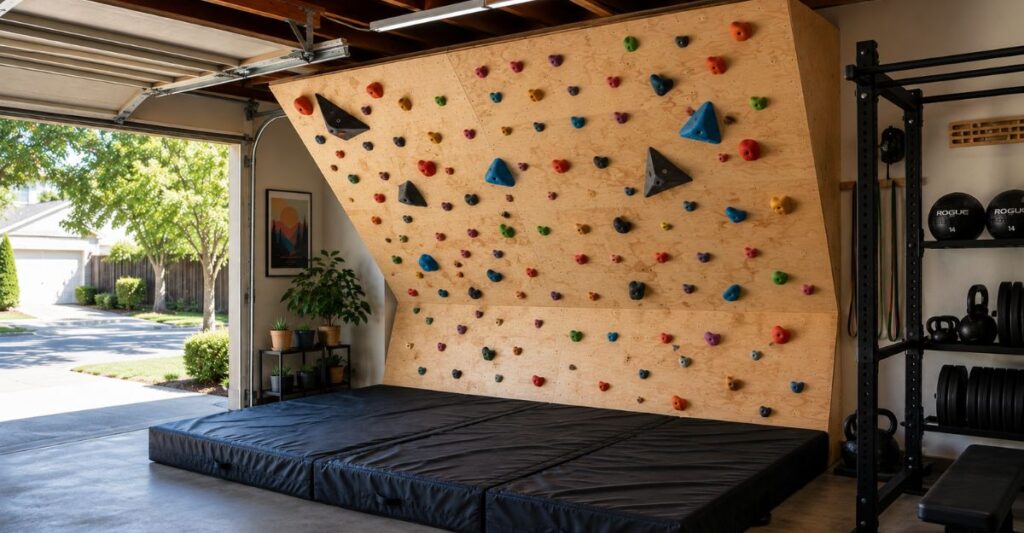
Quick answer: Building a home climbing wall involves framing a wood structure with 2×6 studs spaced 16 to 24 inches on center, sheathing it with at least 3/4 inch structural plywood, drilling a T-nut grid every 8 inches for hold placement, then mounting climbing holds with bolts. Most DIYers complete an 8×8 foot bouldering wall in 2 to 4 weekends for $400 to $1,500 in materials.
A home climbing wall sounds like a bigger project than it actually is. Strip away the intimidation factor and you’re left with carpentry, a grid of drilled holes, and a bag of bolt-on holds — nothing beyond what a reasonably handy weekend DIYer already has in their skill set. What actually trips people up isn’t the building itself, it’s not knowing the specifics: plywood thickness, framing spacing, wall angle, how loads move through the structure, and how many T-nuts a single sheet really needs. This guide leans on the specs experienced builders, route setters, and climbing wall companies actually use, not rough guesses pulled from a forum thread. Most first-time builders overbuild the frame and underbuild the planning — worth keeping in mind before you buy a single board.
Quick Facts
- Minimum plywood thickness: 3/4 inch structural plywood
- Standard framing: 2×6 lumber, 16 inches on center
- Standard T-nut spacing: 8 inch grid, roughly 72 per 4×8 sheet
- Most common home wall angle: 20 to 30 degree overhang
- Typical build timeline: 2 to 4 weekends
- Typical total cost: $400 to $1,500
Cost Summary Box
- Structural plywood: $60 to $95 per 4×8 sheet, 3/4 inch minimum
- Framing lumber (2×6): $15 to $20 per 8-foot stud
- T-nuts: $0.20 to $0.50 each, 70 to 100 per sheet
- Climbing holds: $150 to $400 for a starter set of 30 to 50
- Total project cost: $400 to $1,500 for an 8×8 to 8×12 wall, DIY labor
- Build timeline: 2 to 4 weekends
Detailed Cost Breakdown
Direct answer: A typical DIY home climbing wall costs $400 to $1,500 in materials for an 8×8 to 8×12 foot wall, covering framing, plywood, T-nuts, holds, and hardware. A contractor build typically doubles or triples that total.
| Category | Item | Realistic Price Range |
| Lumber | 2×6 framing studs, plates, bracing | $80 to $180 |
| Structural plywood | 3/4 inch sheets, 2 to 4 typical | $120 to $380 |
| T-nuts | 150 to 300 units for a full wall | $30 to $150 |
| Climbing holds | Starter set, 30 to 50 pieces | $150 to $400 |
| Paint or sealant | Exterior-grade, 1 to 2 coats | $30 to $60 |
| Hardware | Lag bolts, carriage bolts, structural screws | $40 to $90 |
| Crash pad or padded flooring | Foam mat or dedicated pad | $80 to $250 |
| Miscellaneous | Drill bits, sandpaper, finishing supplies | $20 to $50 |
| Total | $550 to $1,560 |
Most first-time builders land toward the middle or upper end of this range. It’s an easy trap: you don’t realize how many T-nuts and holds you actually want until you’re standing in front of bare plywood, trying to picture your first route. Buying a slightly larger hold set upfront beats placing a second small order two weeks later.
Home Climbing Wall vs. Climbing Gym
Direct answer: A home wall costs $400 to $1,500 once, is available any time, and offers unlimited route customization, but is limited to one or two angles. A gym costs $60 to $120 monthly but offers far more variety and structured progression.
| Factor | Home Climbing Wall | Climbing Gym |
| Cost | $400 to $1,500 one-time | $60 to $120 per month |
| Convenience | Available any time, no commute | Fixed hours, travel required |
| Training variety | Limited to your wall’s size and angle | Large variety of angles and heights |
| Maintenance | Your responsibility | Handled by staff |
| Route customization | Fully customizable | Set and changed by staff |
| Skill progression | Best as supplemental training | Better for structured progression |
Recommendation: A home wall earns its keep if you already climb regularly and want convenient supplemental training, or if you’re building it for family use. It’s a weaker substitute for a full gym if you’re just starting out and want variety and community around you. Plenty of serious home climbers end up doing both.
Planning Your Wall: Space, Angle, and Attachment Method
Direct answer: Planning means choosing attached versus freestanding, selecting a training-appropriate angle, and confirming your space has enough width, height, and fall clearance in front of the wall.
Attached vs. freestanding: An attached wall bolts into an existing stud wall or ceiling joists, borrowing your house’s own structure to carry the load — cheaper and simpler since you’re not building support from scratch. A freestanding wall is fully self-supporting, which costs more and needs heavier bracing, but it’s the right call in rentals or spaces without a suitable attachment point.
Standard dimensions:
| Dimension | Common Range | Notes |
| Wall height | 8 to 10 feet | Matches garage and basement ceilings |
| Wall width | 8 to 12 feet | 8 feet matches one plywood sheet width |
| Recommended ceiling height | 9 feet minimum | Headroom above an overhang |
| Minimum room depth | 6 to 8 feet in front of wall | Crash pad placement and fall clearance |
| Beginner-friendly size | 8×8 feet, vertical or mild overhang | Enough variety without an intimidating scale |
A garage or basement climbing wall almost always ends up sized by the room rather than by an ideal spec on paper, and that’s fine. A smaller wall you actually use beats an ambitious one that eats your entire garage gym and never quite gets finished.
Choosing a wall angle:
| Angle | Training Effect | Best For |
| Vertical (0 degrees) | Technique and footwork | Beginners |
| 10 to 20 degree overhang | General strength and power | Intermediate, all-around |
| 30 to 45 degree overhang | Pure power, steep movement | Experienced climbers |
| 45+ degrees (steep board) | Maximum power, very demanding | Strong climbers only |
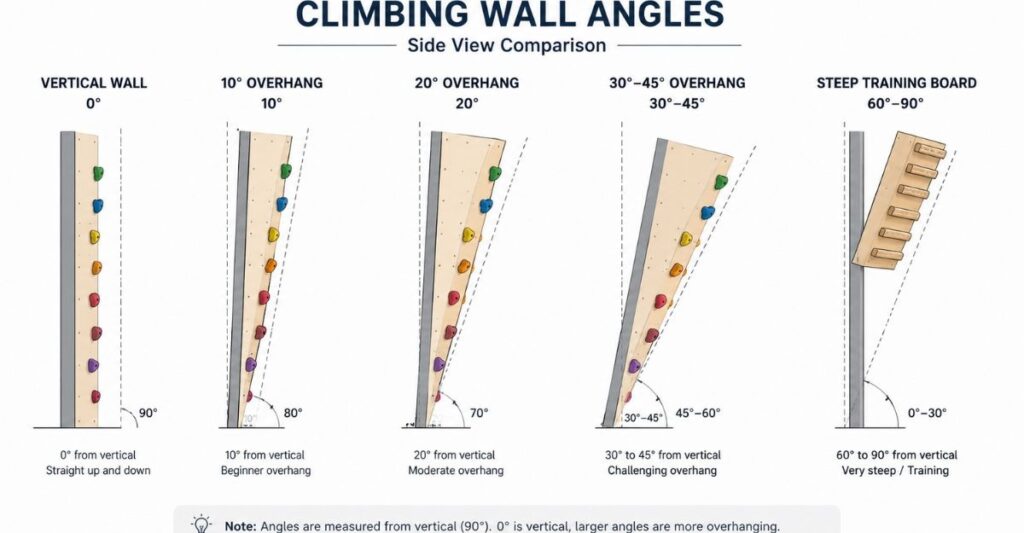
A 20 to 30 degree overhang hits the best balance for most home builders steep enough for real strength gains without scaring off less experienced climbers in the household. Design in 8-foot-wide modules to match plywood width, and you’ll save yourself a lot of awkward cutting later. Competition angles sanctioned by the International Federation of Sport Climbing (IFSC) regularly exceed 45 degrees, which is a useful reference point for just how demanding steep training really gets. Fixed training board systems like the MoonBoard and Kilter Board are a specialized version of this same overhang concept, built at a set angle with a standardized hold layout.
Pro Tip: If you’re unsure, build the lower wall vertical and transition to a mild overhang for the top third. That gives you technique and power training on one structure instead of forcing a compromise.
Builder Insight: Route setters will tell you the most common regret isn’t picking the wrong angle it’s picking one angle and never varying it. Even a single transition point keeps a wall interesting for years longer than a flat, single-angle surface ever will.
Home Climbing Wall Pros and Cons
| Advantages | Disadvantages |
| No monthly membership cost | Significant upfront cost and time |
| Available any time | Limited to one or two angles |
| Fully customizable routes | Ongoing maintenance is on you |
| Great for kids and family use | Smaller footprint than a gym |
| Builds strength between gym sessions | Less community aspect |
| Adds usable value to a garage | Takes up permanent space |
| One-time cost, not recurring | Resale or rental considerations |
| Matches exact space constraints | Requires basic carpentry skills |
Understanding the Engineering: Loads, Anchors, and Bracing
Direct answer: A wall must handle dead load (its own weight), live load (a climber’s static weight), and dynamic load (fall or dyno force), distributed through solid anchor points into load-bearing framing, with bracing preventing the structure from racking sideways.
- Dead load: the wall’s own weight, constant and predictable.
- Live load: a climber standing or hanging statically, variable but gentle.
- Dynamic load: force from a fall, dyno, or sudden catch, briefly several times body weight this is the case that actually drives hardware sizing.
- Load distribution: force spreading from a hold through the T-nut, plywood, and framing into anchor points, ideally across multiple studs rather than one weak point.
- Anchor points: where the frame attaches to your home’s structure a load-bearing wall, ceiling joists, or added blocking. These need solid framing, not drywall alone.
- Wall bracing: diagonal cross bracing resists racking under lateral dynamic load, essential on any freestanding wall.
Common Mistake: Anchoring into blocking that isn’t itself rigidly fastened to load-bearing structure. Blocking only does its job if it’s as solid as the framing around it otherwise it’s just a false sense of security.
Permits and Building Codes
Direct answer: Most home bouldering walls under roughly 10 feet don’t require a permit, treated as furnishings rather than structural additions. Taller or freestanding structures, or work on a load-bearing wall, may fall under International Residential Code (IRC) or local review.
- Permits are typically not required for a standard wall under about 10 feet that doesn’t alter existing structure.
- Larger freestanding structures may fall under International Code Council (ICC) building or residential provisions depending on local adoption, particularly if permanently anchored or exceeding typical furniture load classifications.
- Adding blocking between existing studs generally doesn’t require a permit; altering the load-bearing wall’s framing itself is a different matter and may.
- Consult a structural engineer if your wall exceeds 10 to 12 feet, will hold multiple climbers simultaneously, or attaches to structure you’re not confident is sound.
- Always check with your local building department before starting anything larger than a straightforward garage or basement wall.
Plywood Types Compared
Direct answer: Structural plywood, ACX or Baltic Birch, is correct for a climbing surface. CDX works only for backing or bracing. OSB should be avoided entirely due to poor moisture resistance and excessive flex under dynamic load.
| Plywood Type | Strength | Moisture Resistance | Weight | Price | Best Use |
| ACX | High | Good | Moderate | Higher | Primary climbing surface |
| Baltic Birch | Very high | Good | Heavy | Highest | Premium surface, best T-nut holding |
| CDX | Moderate | Fair | Moderate | Lowest | Backing or bracing only |
| OSB | Low | Poor | Heavy | Low | Not recommended for any wall part |
Quick Fact: APA – The Engineered Wood Association publishes grading and span-rating standards that most lumberyards stamp directly on the sheet. Looking for an APA-rated sheet is an easy way to confirm you’re actually getting structural grade, not a look-alike.
Types of Climbing Holds Explained
Direct answer: Holds fall into six categories: jugs (large, beginner-friendly grips), crimps (small edges for finger strength), pinches (squeezed grip), slopers (rounded, friction-dependent), pockets (small finger holes), and edges (flat, usable at any level).
| Hold Type | Description | Best Skill Level | Training Purpose |
| Jugs | Large, easy-to-grip holds | Beginner | Warm-up, endurance, confidence |
| Crimps | Small edges gripped with fingertips | Intermediate to advanced | Finger and grip strength |
| Pinches | Gripped by squeezing both sides | Intermediate | Pinch and grip strength |
| Slopers | Rounded, no positive edge | Advanced | Body tension, friction technique |
| Pockets | Small holes fitting one or two fingers | Advanced | Targeted finger strength |
| Edges | Flat, incut holds, varying size | All levels | Technical footwork and hand positioning |
Builder Insight: Route setters generally recommend roughly 60 percent jugs and edges, 25 percent crimps and pinches, and 15 percent slopers and pockets for a first hold order. That ratio keeps most routes approachable while still leaving room for genuine challenge as you improve.
Materials List: What You Actually Need
| Material | Specification | Approximate Cost |
| Structural plywood | 3/4 inch minimum, ACX or Baltic birch preferred | $60 to $95 per 4×8 sheet |
| Framing lumber | 2×6, not 2×4, for rigidity and warp resistance | $15 to $20 per 8-foot stud |
| T-nuts | 3/8-16 thread, standard for climbing holds | $0.20 to $0.50 each |
| Carriage bolts or lag bolts | For attaching frame to existing structure | Varies by length and quantity |
| Structural screws | 2.5 to 3 inch, for plywood-to-frame attachment | Standard box, under $20 |
| Climbing holds | Starter set, mixed sizes | $150 to $400 for 30 to 50 holds |
| Wood finish or paint | Exterior-grade if the wall will see moisture | $30 to $60 |
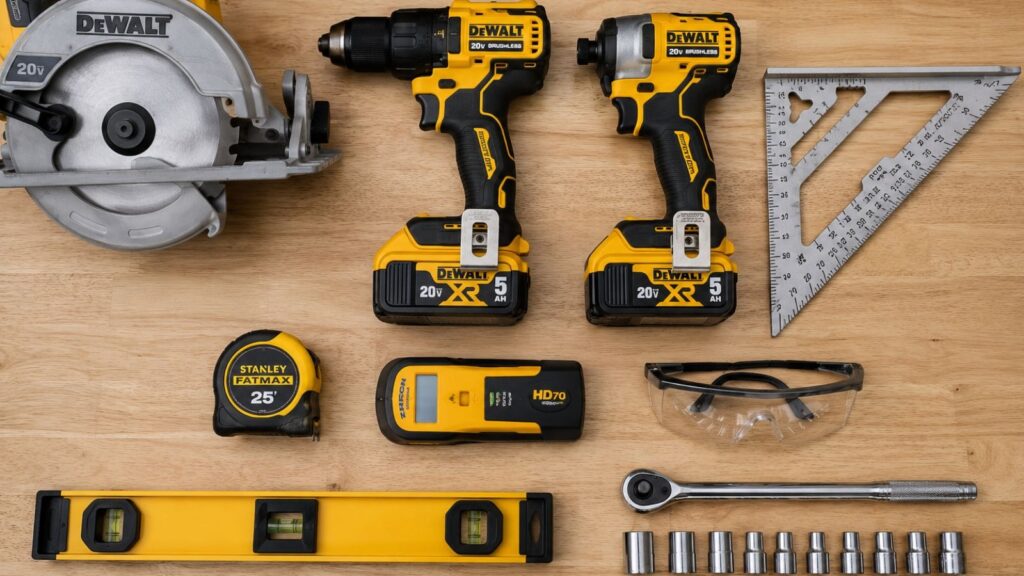
Tools You’ll Need
| Tool | Why You Need It |
| Circular saw | Cuts framing lumber and plywood to size |
| Drill | Drives pilot holes and general fastening |
| Impact driver | Drives lag bolts and structural screws with less strain than a standard drill |
| Speed square | Marks accurate square and angled cut lines, essential for overhang studs |
| Tape measure | Accurate framing and T-nut grid layout |
| Stud finder | Locates studs or joists for load-bearing attachment points |
| Level | Confirms the frame is plumb before final attachment |
| Socket wrench | Tightens lag bolts and carriage bolts to spec |
| Safety glasses | Protects against wood chips and dust while cutting and drilling |
| Hearing protection | Drilling dozens to hundreds of T-nut holes and running a saw for hours adds up |
Common Mistake: Skipping the stud finder and eyeballing attachment points is a genuinely risky shortcut. A climbing wall puts repeated dynamic load on attachment points, not the gentle static load of a picture frame, so guessing at stud or joist locations is a real structural risk, not just a rookie inconvenience.
Step-by-Step: How to Build Your Climbing Wall
Direct answer: Building follows seven steps: design and mock up the wall, frame it with 2×6 lumber, attach the frame to solid structure, drill the T-nut grid, mount the plywood, finish and seal the surface, then bolt on climbing holds.
Step 1: Design and Mock Up Your Wall
Sketch your wall to scale before cutting anything, marking every stud and joist location and any obstructions along the way. Mocking up the angle and dimensions with painter’s tape gives a far better feel for the final footprint than a drawing ever will — you’ll actually see where your head clears the ceiling and where the crash pad needs to sit.
Expert Tip: Mock up the wall angle with a single scrap board and a protractor app before committing to a full frame. It catches “felt right on paper but too steep in person” problems before they cost you real lumber.
Step 2: Frame the Wall
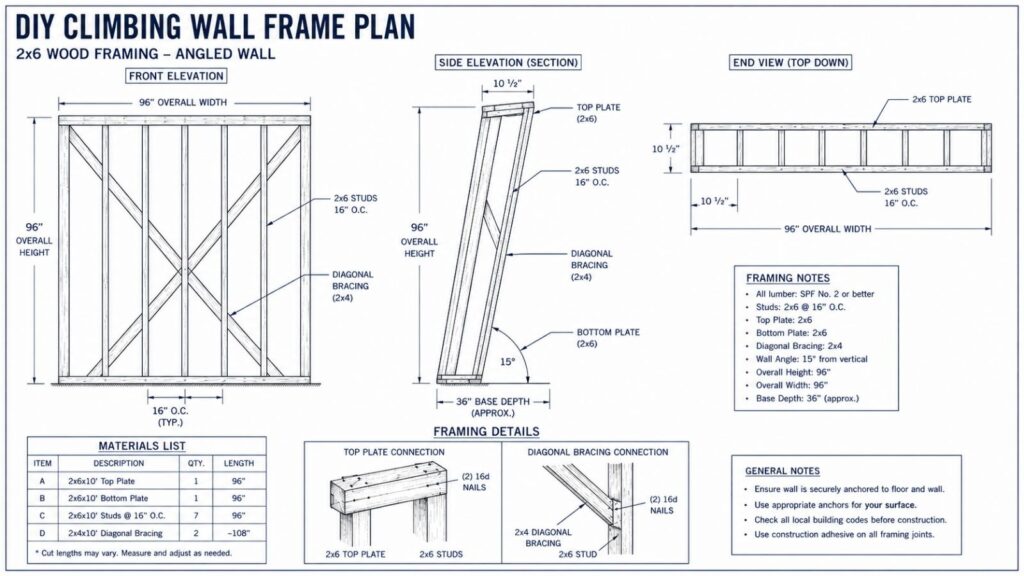
Use 2×6 lumber it’s stiffer and more warp-resistant than 2×4 under repeated climbing load, and that difference matters more than it seems like it should. Space studs 16 inches on center to match plywood dimensions; 24 inches works for lighter-duty walls.
For an overhanging wall, cut studs at an angle so the plates sit flat against existing structure while the wall leans out. Mark the angle on one stud with a T-bevel and use it as a template for the rest, rather than re-measuring every single cut.

Add diagonal cross bracing to prevent racking this isn’t optional on a freestanding wall. Build the frame on the ground and raise it into position afterward; it’s far easier to work with lumber flat than fighting gravity mid-assembly.
Common Mistake: Building the frame square on paper without checking it against the real wall or ceiling. Houses settle and ceilings aren’t always flat, so dry-fit before you commit to permanent fasteners.
Step 3: Attach the Frame to Your Structure
Bolt the completed frame to your support structure existing load-bearing wall, ceiling joists, or freestanding base using lag bolts or carriage bolts sized for the load. Confirm plumb and level before final attachment, because it’s much harder to correct once everything is bolted down.
Safety Warning: Never anchor into drywall alone. Drywall anchors aren’t rated for a climbing wall’s dynamic, repeated loads. Every anchor point needs solid framing behind it.
Step 4: Drill T-Nut Holes Before Mounting Plywood
Do this on sawhorses before the plywood goes up, not after drilling into a wall that’s already mounted is awkward at best and inaccurate at worst. Space T-nuts on an 8-inch grid, starting 4 inches from the edge, which works out to roughly 72 per sheet. Plan for 70 to 100 total to keep placement flexible without over-perforating the panel.
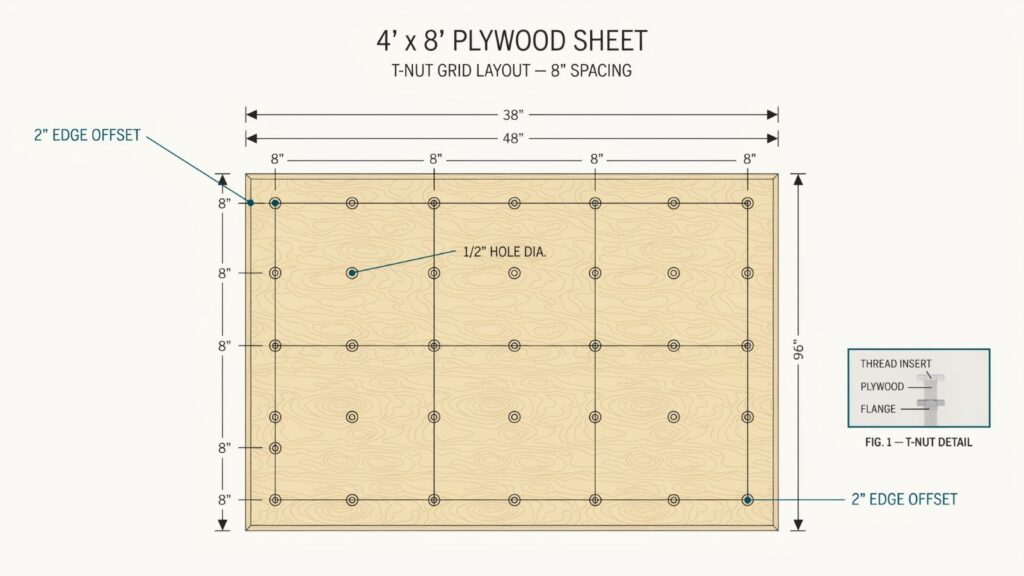
Stack sheets together, mark grid lines with a chalk line, and drill through multiple sheets at once with a 7/16 inch bit. Seat T-nuts from the back with a socket or threaded rod.
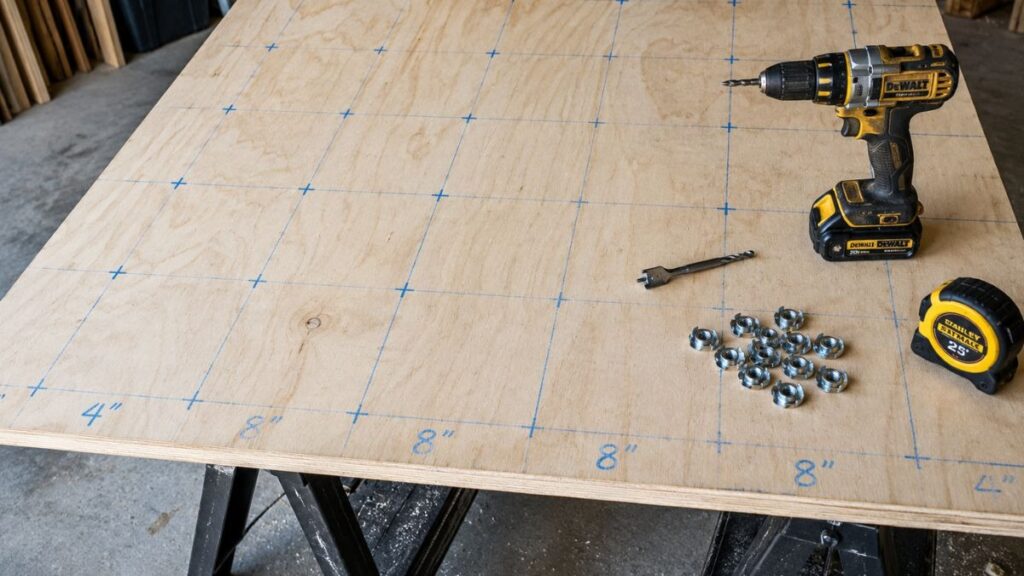
Pro Tip: Clamp three or four sheets together rather than drilling one at a time. It’s dramatically faster, and it guarantees every panel lines up identically once they’re mounted side by side.
Step 5: Mount the Plywood to the Frame
Attach plywood with structural screws spaced consistently around the perimeter and into every stud crossed. Plan seams to land on a stud so both adjoining sheets have solid backing — a seam floating between studs is a weak point waiting to happen.
Step 6: Finish and Protect the Surface
Apply exterior-grade paint or sealant before mounting holds, especially in a garage or basement where humidity swings are common. Moisture weakens plywood fastest right at the T-nut holes, which is exactly where the wall needs to be strongest. If you want the finish to hold up as well as the frame does, it’s worth treating this step with the same care you’d give any interior wall paint repair proper prep and a good coat go a long way toward preventing peeling later on.
Step 7: Mount Climbing Holds
Holds bolt through the T-nut from the front. Start with a mix of sizes and shapes rather than one type, since that’s what actually gives you route-setting variety instead of a wall full of near-identical problems.
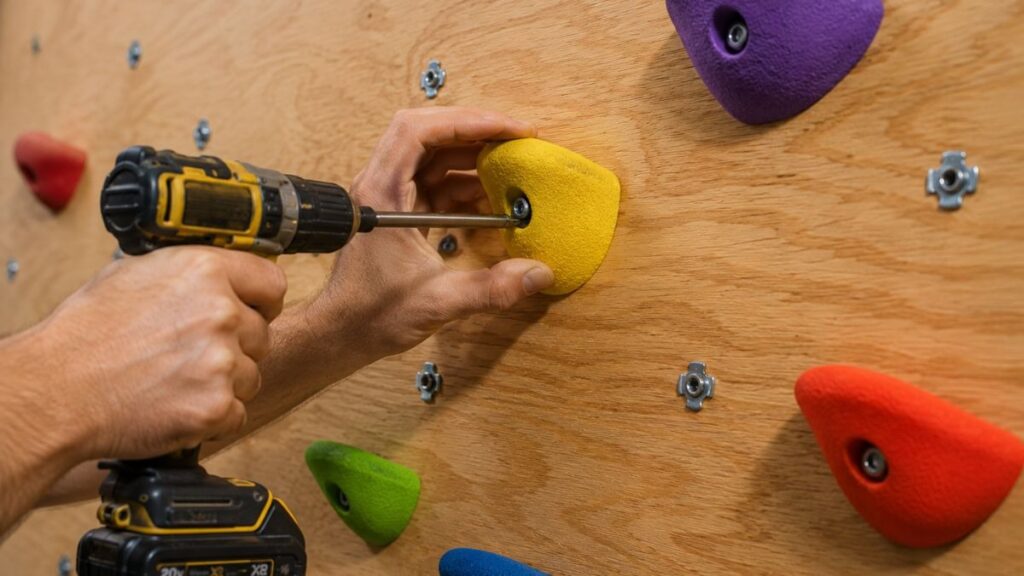
Realistic expectation: Your first hold layout won’t be your final one. Most builders rearrange repeatedly over the first few months — which is exactly why the T-nut grid matters more than any single hold placement decision you make on day one.
Safety Considerations
Direct answer: A bouldering wall under 8 feet is typically climbed without a rope, relying on crash pads. Key measures include a spotter, 4 to 6 inches of padding beneath the wall, no substituted hardware, and a structural engineer for walls over 10 to 12 feet.
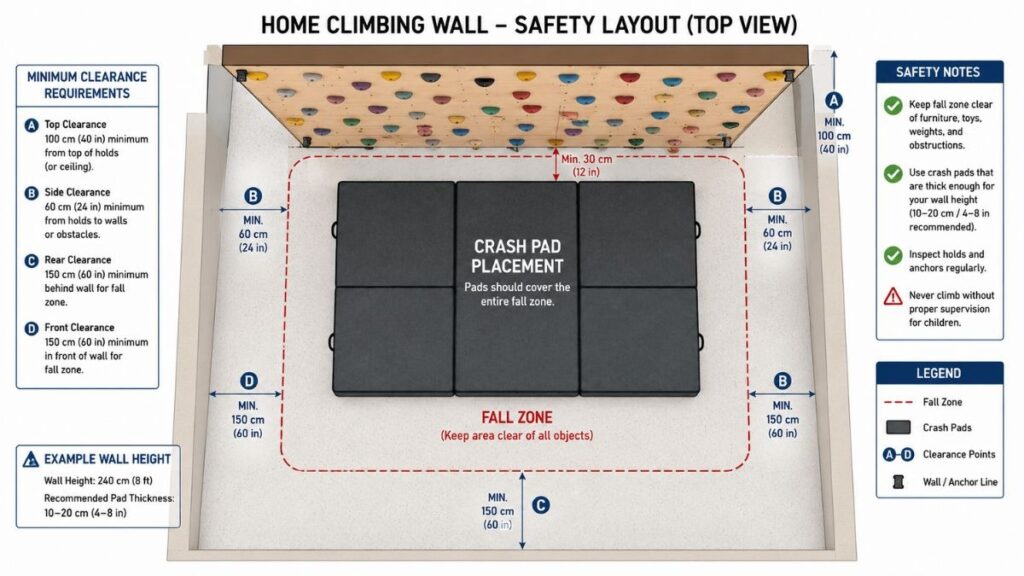
- Always use a spotter, especially on overhanging sections where a fall carries more horizontal momentum.
- Install adequate padding, a crash pad or foam mat, minimum 4 to 6 inches, directly beneath the wall.
- Never substitute standard T-nuts, bolts, or plywood grades below what’s specified here.
- Consult a structural engineer if your wall exceeds roughly 10 to 12 feet or will regularly hold multiple climbers at once.
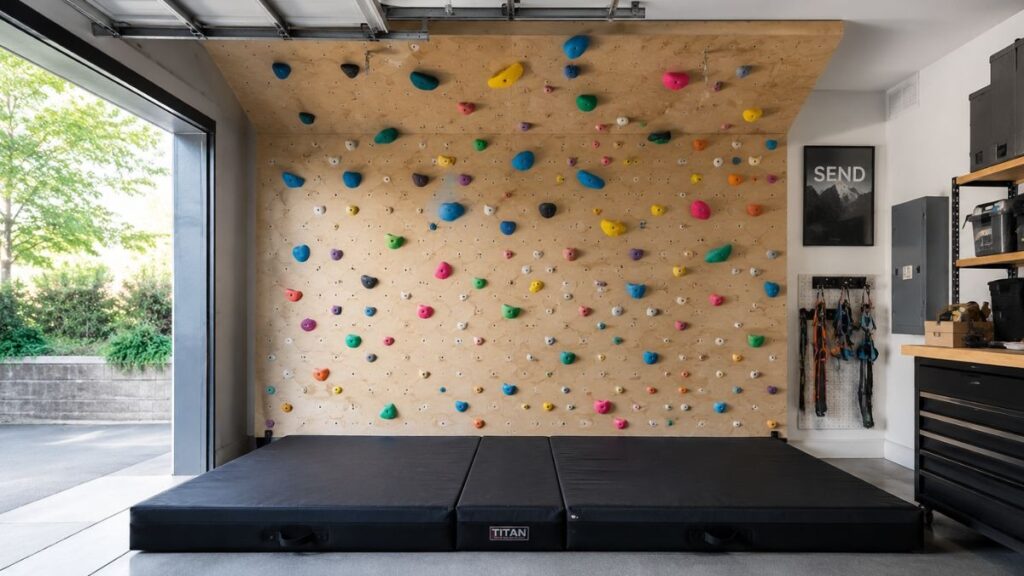
The Climbing Wall Association publishes structural and design standards worth reviewing for larger builds or when working with an engineer. General fall-hazard and working-at-height guidance from OSHA also applies directly to building at height in a garage or basement.
How to Maintain a Home Climbing Wall
Direct answer: Maintenance includes cleaning holds every few months, tightening bolts monthly, checking T-nuts for looseness, inspecting plywood for soft spots, reapplying sealant as needed, and one full annual inspection of every anchor point.
- Clean holds periodically; chalk and hand oils make them slicker over time.
- Tighten hold and structural bolts regularly, they loosen gradually under dynamic load.
- Check T-nuts for spinning, a sign one has worked loose from the back of the panel.
- Inspect plywood for soft spots or delamination, especially near T-nut holes and the perimeter.
- Reapply sealant or paint if the finish wears thin, particularly with seasonal humidity swings.
- Do a full annual inspection of every bolt, T-nut, and the plywood surface as one complete pass.
Common Mistake: Assuming nothing needs attention because nothing feels loose during a climb. Dynamic loads don’t always announce a loosening bolt the way a squeaky floorboard does scheduled checks catch what casual use simply won’t.
Common Mistakes to Avoid
- Using OSB instead of plywood the weight, flex, and moisture sensitivity aren’t worth the savings.
- Skipping diagonal bracing on a freestanding wall, the most common cause of a wobbly build.
- Spacing T-nuts too far apart, leaving awkward gaps with no good hold placement.
- Mixing plywood sheet orientation, throwing off T-nut grid alignment across seams.
- Underestimating clearance space; keep furniture and fixtures out of the fall zone.
- Building the angle before deciding the training goal; a wall too steep for a beginner in the household often ends up unused.
Beginner Tips for Building Your First Home Climbing Wall
- Start smaller than you think you need. A finished 8×8 wall beats a stalled 12×16 build.
- Buy 10 to 15 percent more T-nuts than your grid calls for.
- Dry-fit your frame against the real wall or ceiling before final attachment.
- Mock up the wall angle with a scrap board before cutting angled studs.
- Choose 2×6 over 2×4 despite the cost, the rigidity matters under dynamic load.
- Don’t skip the stud finder, guessing at attachment points is the riskiest shortcut here.
- Drill T-nut holes in stacked sheets before mounting, never after.
- Buy a genuinely mixed hold set for your first order, variety beats quantity early on.
- Budget real time for finishing and sealing, easy to rush and skip.
- Plan your crash pad into the initial budget, not as an afterthought.
Beyond the Build: Long-Term Wall Ownership
- Route rotation: Rearrange holds every 4 to 8 weeks — even a modest set produces very different problems once positions change.
- Hold organization: A bin system sorted by hold type speeds up route setting versus one mixed pile. If you’re already building storage into your garage setup, it’s worth borrowing a few tricks from projects like a DIY mudroom bench with built-in storage — the same cubby-and-bin logic works just as well for sorting holds and hardware.
- Seasonal inspection: Check bolts and T-nuts each season, not just annually, especially in garages with wider temperature swings.
- Humidity management: A basic dehumidifier extends the life of plywood and finish in humid garages. If moisture is a recurring issue in your space, it’s the same underlying problem you’d solve for with proper drainage and sealing on a project like a DIY outdoor shower — keeping water away from wood is the common thread.
- Noise reduction: Rubber isolation strips between frame and studs can meaningfully cut impact noise into adjoining rooms.
- Future upgrades: Leave an extra stud bay of clearance so a second angled section, campus board, or fingerboard can be added later without reframing. If you’re already planning ahead, it’s also a good time to think about small smart home upgrades like a motion-activated light over the wall or a simple sensor to track training sessions.
Interactive Tools That Can Simplify Planning
A few calculator-style tools speed up planning if you have access to them or build your own quick spreadsheet version:
- Cost calculator: turns wall dimensions and angle into a full material estimate.
- Lumber calculator: converts dimensions and stud spacing into an exact board count and cut list.
- Plywood calculator: determines sheet count and optimizes layout to reduce waste.
- Hold quantity calculator: estimates holds needed based on wall square footage and target density.
- T-nut calculator: calculates exact T-nut count from grid spacing and dimensions.
- Wall angle calculator: translates a target overhang angle into the correct stud cut angle.
Frequently Asked Questions About Building a Home Climbing Wall
How much does it cost to build a DIY home climbing wall?
A typical 8×8 to 8×12 foot wall costs $400 to $1,500 in materials, covering plywood, framing, T-nuts, and a starter hold set. A contractor build typically doubles or triples that.
What thickness of plywood is needed for a climbing wall?
3/4 inch is the standard minimum, strong enough to securely hold T-nuts and resist a bolt tearing through under a climber’s weight.
How many T-nuts do I need per sheet of plywood?
Plan for 70 to 100 per standard 4×8 sheet. An 8-inch grid starting 4 inches from the edge yields about 72 per sheet.
What is the best wood for a climbing wall frame?
2×6 lumber, stiffer than 2×4 and more warp-resistant. For the surface, structural plywood, not OSB, at 3/4 inch minimum.
How long does it take to build a home climbing wall?
Most builds take 2 to 4 weekends, roughly one for framing, one for sheathing and T-nuts, and additional evenings for holds.
Do I need a permit to build a home climbing wall?
Usually not for a standard wall under about 10 feet, treated as furnishing rather than structural work. Larger or freestanding structures may fall under local IRC or IBC provisions.
Can I build a climbing wall angle other than vertical?
Yes, overhangs between 10 and 45 degrees are common in home builds and offer more strength-training variety than a flat vertical wall.
What size climbing wall is best for a beginner or first build?
An 8×8 foot wall, vertical or mild overhang, offers genuine route variety, fits most garages, and matches a single plywood sheet width.
What’s the difference between a home bouldering wall and a training board like a MoonBoard or Kilter Board?
A general wall uses a mixed hold set at whatever angle you choose. A MoonBoard or Kilter Board is a standardized, app-connected system with a fixed layout and angle, built for tracking specific repeatable problems.
How much weight can a home climbing wall hold, and can two people climb at once?
Built with 2×6 framing on 16-inch centers, 3/4 inch plywood, and solid anchor points, a wall safely supports one climber including fall forces. Simultaneous multi-climber use needs wider framing and more robust anchoring planned in from the start, not added after.
Is a home climbing wall safe for children, and can I build one in an apartment?
Yes for kids, with supervision, a thick crash pad, and a lower, vertical angle rather than a steep overhang. For apartments or rentals, a freestanding wall avoids permanent modification, though checking your lease is still worth doing given its size and weight.
How do I stop climbing holds from spinning or coming loose?
A spinning hold usually means the T-nut worked loose from the back of the panel. Tightening helps temporarily, but a genuinely loose T-nut needs reseating or replacing.
Bottom Line on Building a Home Climbing Wall
A home climbing wall is a genuinely achievable weekend project once you have the real specs: 2×6 framing on 16-inch centers, 3/4 inch structural plywood, an 8-inch T-nut grid, sound anchor points into load-bearing structure, and a wall angle matched to how you’ll actually train. Skipping the planning and engineering basics is where most DIY walls run into trouble, not the building itself. Sketch it out, decide attached versus freestanding, understand your loads and anchors, pick your angle deliberately, and the rest is straightforward carpentry.
For more project ideas in the same spirit, browse our full DIY Projects section for other weekend-scale builds that don’t require a contractor.

I started Domelite Home because I got tired of home improvement advice that was either too vague or written by people who had never actually picked up a drill. I’m Naik Zali Shah I’ve spent years obsessing over renovation projects, smart home setups, and interior design, and I built this site to share what actually works. No fluff, no filler. Just honest advice for homeowners who want to get things right the first time.